
Vesta Music Express Tutorials / Platform guide
Vesta Music Quality Control (QC) Tutorial
This is an in-depth tutorial for the quality control (QC) tools of vesta music

By Vesta Music Corporation
· 26 steps · 10 min
Open the Quality control queue
Sign in and select Admin at the top of the sidebar if your account offers both workspaces. Click Quality control. Read the release and track counts, then locate the submission you want to review.
This walkthrough follows Vesta Music Track by vesta, submitted by Demo Admin. The queue shows one release containing one track. No UPC means the release has no assigned UPC at this stage; it does not describe the track count or review outcome. Screenshots show Vesta Music Demo version 3.2.4 on 13 November 2026. The demo limits final distribution; its sample statuses and scans do not certify the release.
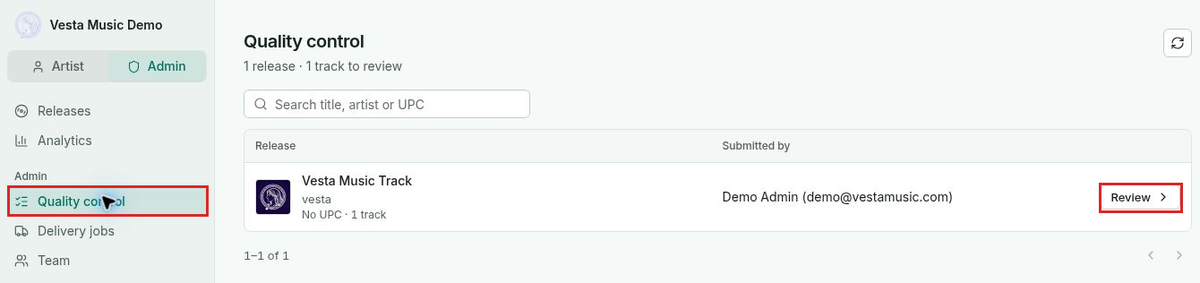
Open Quality control and locate the submission in the queue. Find the release and open its review
Use Search title, artist or UPC to narrow the queue. Enter Vesta for this example and wait for the list to update. Confirm the release title, artist and submitter, then click Review in the matching row.

Search by title, artist or UPC, then click Review. Confirm the submission header
Check the release title and artist at the top of the review page. Use the Quality control breadcrumb to return to the queue. If you need to reload the submission, first check that any edits have saved, then use Refresh submission.

Confirm the release title and artist in the review header. Inspect the artwork
Check that the cover belongs to the release, is readable, and agrees with the artist and title where these appear. Compare it with the current artwork requirements in Content guidelines.
Use Open artwork in a new tab for closer inspection. If the enlarged asset does not load, resolve that access issue before relying on a small preview to judge fine detail.

Inspect the submitted artwork before interpreting scan results. Investigate the cover scan
Read the cover scan beneath the artwork. Complete means processing has finished. Best guess is the scan's classification; the example says illustration.
Treat web matches as investigation leads. Compare relevant matches with the cover and request supporting rights information when needed. A match alone does not establish unauthorized use, and a completed scan does not approve the artwork.
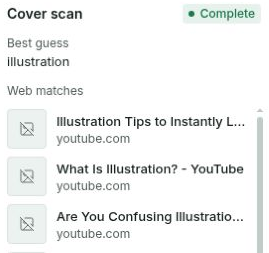
Read the cover scan and investigate relevant web matches. Verify release metadata
Read Details from top to bottom and compare the submitted fields with the information supplied by the artist or label. Check identifiers, release dates, genre, audio language, metadata language, parental advisory and compilation status.
The example has a release date of 26 October 2026 and an original release date of 19 October 2026. Confirm that both dates intentionally describe the release. Not assigned is the displayed UPC state; do not invent an identifier to fill the gap.
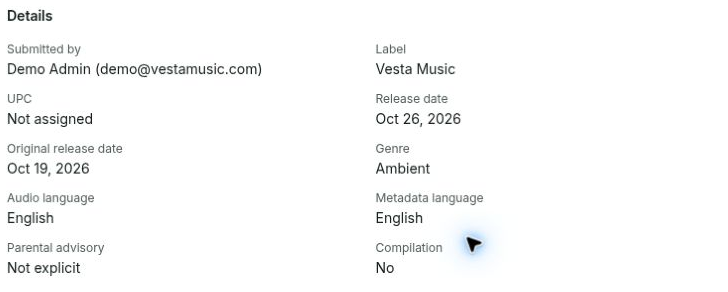
Verify release identifiers, dates, languages and advisory settings. Check rights information
Check the named rights holder and both rights lines against the supplied information. Publishing is the label used by this interface.
The demo uses First Last as sample text. In a real review, resolve placeholder names, missing permissions or conflicting ownership information through clarification and supporting documentation.

Check the submitted rights holder and rights lines. Review release credits
Verify the main artist, composer, lyricist, instruments and producer where applicable. Check spelling and role accuracy rather than assuming each contributor has the same role. Later, compare the release credits with the credits attached to each track.

Review release artist and contributor credits. Check stores and territories
Continue to Distribution. Confirm that the selected stores and territories agree with the release plan and the rights available for the submission.
Store chips show intended destinations; they do not confirm receipt or publication. Worldwide must agree with the supplied permissions. Request clarification or correction before delivery if rights cover fewer territories.
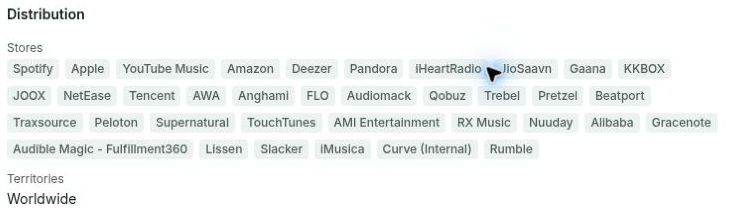
Confirm the intended stores and territories. Record release-wide issues
Use Release notes below Distribution for cover replacements, release date corrections, label issues or other problems affecting the whole submission.
- Public notes are visible to the submitter. Identify the exact field or asset and the correction needed.
- Internal notes are hidden from the submitter. Use them for reviewer reasoning, checks performed or team follow-up.
Hypothetical public note: Please confirm the original release date and update it if this is the first publication of this recording. The release date and original release date currently differ.
Hypothetical internal note: Dates need confirmation from the label before the release review can be completed.
These are writing examples, not findings on this submission. Put track-specific issues in that track's Notes section. Continue to Tracks before choosing an outcome.

Use public release notes for corrections and internal notes for reviewer context. Expand each track
Under Tracks, read the reviewed count and each row's status. Expand the row using its chevron to reveal the player, details, credits, scans and notes.
The demo's only track starts with an Approved badge. Review the content instead of treating a pre-existing badge as your conclusion. A count such as 1 of 1 reviewed tracks review progress; it does not establish release delivery.

Expand the track row to reveal its review controls. Listen to the audio preview
Click Play preview, then use Pause preview to stop. Listen across the recording, including its beginning and ending. Move the Playback position slider to inspect another section.
Check that this is the intended recording, that it plays correctly, and that there is no unexpected silence, cutoff or obvious defect. Record a time reference for any issue tied to a particular point.

Play the preview and move through the recording with the playback slider. Verify track details and credits
Check the ISRC, recording type, duration and parental advisory. The example is Original, 3:26 and Not explicit, with no ISRC assigned. Compare contributor names and roles with the release credits, allowing for legitimate differences between tracks.
Check duration and other technical requirements against the applicable current specifications in Content guidelines. Duration alone is not a complete audio assessment, and the preview does not display every property of the original file.
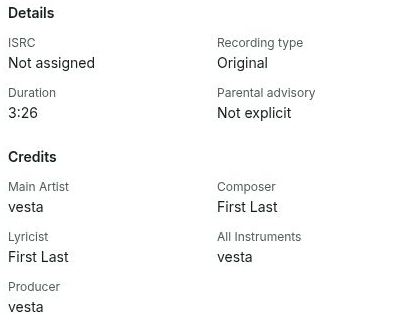
Verify track metadata and compare track credits with release credits. Read the AI scan result in context
After listening and checking metadata, read Scan details. Complete describes processing and is separate from the human review status on the track row.
The example predicts Human with a 14 percent AI probability. Use this as a signal to investigate alongside the audio, submission information and current policy. It is not proof of how the music was made or an automatic approval threshold. Check applicable rights, quality, disclosure and destination requirements.
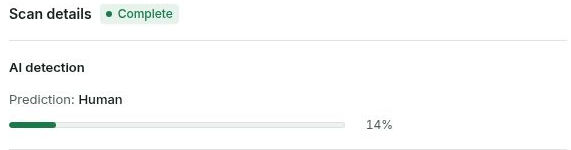
Read the AI prediction alongside the recording and submission information. Check lyrics and moderation results
Open Full lyrics and compare the transcript with the recording, especially the audio language and parental advisory. Listen to confirm suspected mismatches because automated transcripts can contain errors. Seek clarification if the words or language cannot be verified.
No flagged moderation categories means this scan did not flag the listed categories. No matching song found means it did not identify a song match. Continue the content and rights checks even when both results are clear.
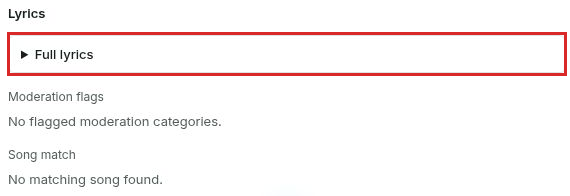
Check the lyrics transcript, moderation and song-match results. Review the copyright scan
Read the copyright scan beneath the details and scan columns. No copyright matches is a scan result, not confirmation that all permissions exist.
If there are samples, licensed material or other rights concerns, review the supporting information required by Content guidelines. Record what needs clarification without asserting infringement solely from a match or its absence.

Review the copyright scan and any supporting permissions. Write actionable track notes
Use the Notes area inside the expanded track for issues affecting that recording. Identify the track, field or time position, what you observed, and the correction or clarification needed. Separate confirmed issues from open questions.
Hypothetical public note: Track 1 ends abruptly at 3:24. Please upload the intended full master with its complete ending, or confirm that this cutoff is intentional.
Hypothetical public note: Please confirm the language of the vocal recording on Track 1. The audio language is currently English; update the field if that does not describe the recording.
Only use an issue after verifying it. Specify the ownership or permission point that needs evidence. Keep reviewer context in Internal notes, but put all corrections the submitter must act on in Public notes. Check the field labels and allow saving to finish before moving on. The source walkthrough left these fields blank.

Write specific public track corrections and keep reviewer context internal. Request a correction for an affected track
Complete the checks and write a clear public note explaining the correction. Put release-wide issues in Release notes as well. Click Request changes at the bottom of the affected track's expanded panel, then wait for the controls to become available again. Track decisions are separate from the release-level action in the footer.

Use Request changes for an affected track after recording the issue. Confirm Changes requested was recorded
Check that the selected track state reads Changes requested. Approve remains available if you need to revise the decision.
This records a track decision; it does not complete the release-level return. Review all remaining tracks before using Return for changes in the release footer.

Confirm the selected track status reads Changes requested. Approve tracks that are ready
After completing the applicable checks and resolving outstanding questions, click Approve and confirm that it changes to Approved. To revise a decision, use the other track control and verify the new state.
Repeat the audio, metadata, scan and note checks for every track. Use row statuses and the reviewed count to track progress. The source walkthrough restored its temporary Changes requested selection to the track's original Approved state.

Confirm Approved after completing the track checks. Return a release that needs changes
Before a release-level action, check the artwork, metadata, rights, credits, distribution scope and all tracks. Make sure public notes describe every issue and agree with the track decisions.
- Select Request changes on each affected track and wait for it to save.
- Read release and track public notes from the submitter's perspective. Each item should explain what needs to change.
- Click Return for changes when ready, follow any confirmation the workspace presents, and verify the resulting release state or queue entry.
The demo shows this control enabled after a track is marked Changes requested. The return itself was not submitted for the source tutorial, so no particular confirmation or notification sequence is illustrated.

Use Return for changes for a submission that needs correction. Complete the release review and verify its outcome
For a ready release, confirm every track has the intended approval state and resolve release-wide issues before using the final release action available in your live workspace. Check the resulting state after submitting it.
This demo limits real distribution and offers Get a Vesta Music Deal. That opens a plan offer and is not evidence of QC approval or store delivery. No unobserved live approval or delivery screen is shown here.
Return through the Quality control breadcrumb and refresh the queue if needed. If the submission remains, inspect its review state before assuming an action failed or repeating it. An Approved track badge alone is not a release delivery confirmation.

The demo footer limits real distribution and shows a plan offer. Check delivery jobs separately after QC
After a release has actually been submitted for delivery, open Delivery jobs in the Admin sidebar. Find the intended release and confirm the operation, UPC and date. The list may contain Delivery, Metadata update and Takedown jobs.
Processing means work is in progress. Completed describes job processing; verify store outcomes and release availability separately. Failed needs investigation. The screenshot shows existing jobs for other demo releases, not delivery results for Vesta Music Track.
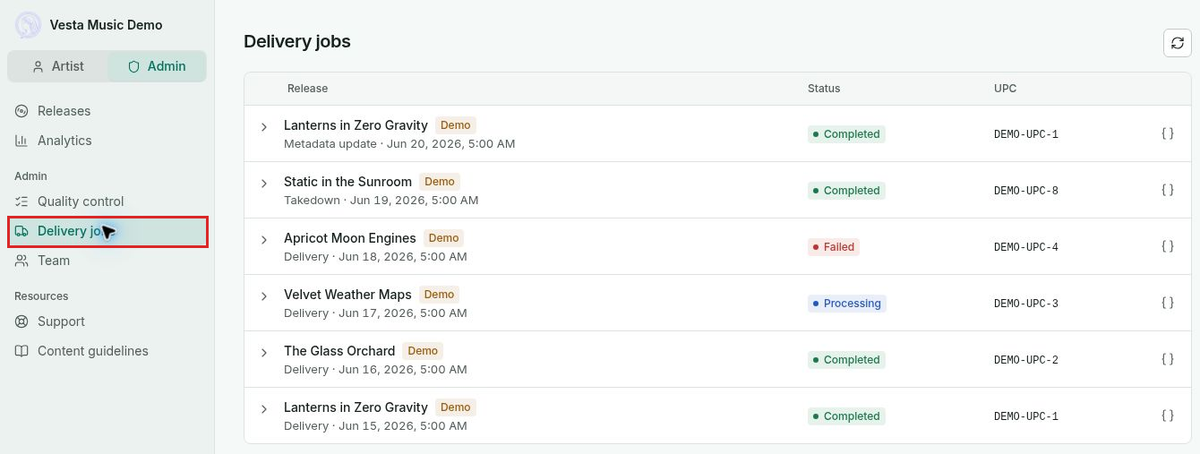
Check the release operation, UPC, date and status in Delivery jobs. Investigate a failed delivery job
Click the chevron beside a job to expand its store results. Read the error and identify affected stores. The Apricot Moon Engines example shows SAMPLE_METADATA_VALIDATION_FAILED.
Use the actual error details to investigate and correct the relevant issue through the appropriate workflow, then check the later job result. This sample error alone does not identify the exact field to correct. Avoid changing unrelated metadata or assuming a retry succeeded. Refresh for the latest information. No delivery or retry was initiated in the source walkthrough.
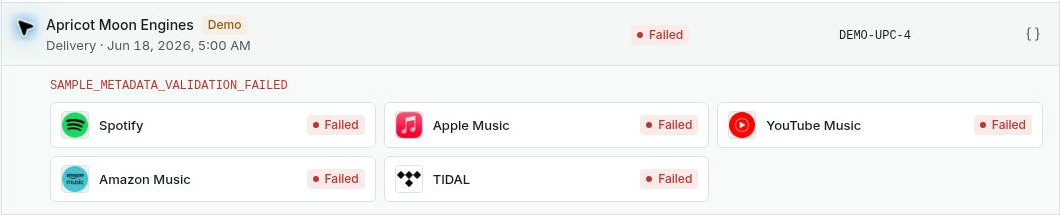
Expand a failed job to read its error and store-level results. Clear filters when a submission appears missing
When resuming QC, check the search field first. No matching submissions can be a filtered empty state hiding a release that is still in the queue.
Click Clear filters or the clear icon in the search field and wait for results. Search again with a shorter title fragment, artist or available UPC. Confirm the intended Admin workspace before concluding the release is missing.
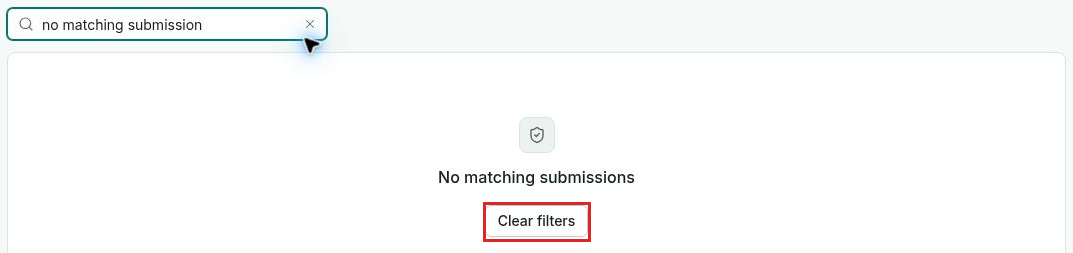
Clear filters when a queue search returns no matching submissions. Refresh the queue and resolve remaining blockers
Use the queue refresh control to reload submissions.
- If a track is collapsed, expand its chevron to reveal audio, scans, notes and decisions.
- If a scan is running, wait for processing and refresh when appropriate. An unfinished scan is not a clean result.
- If Return for changes is disabled, check track decisions. In this demo, Changes requested enables the release-level control.
- If all tracks are reviewed but the release remains, inspect the release-level outcome. Reviewed progress and track approval do not establish distribution.
Use the current Content guidelines under Resources, together with applicable destination requirements, whenever artwork, ownership, metadata, AI content or technical requirements are unclear. Before closing, confirm what you checked, what the submitter must change, and what state the service recorded. Keep notes and decisions consistent.
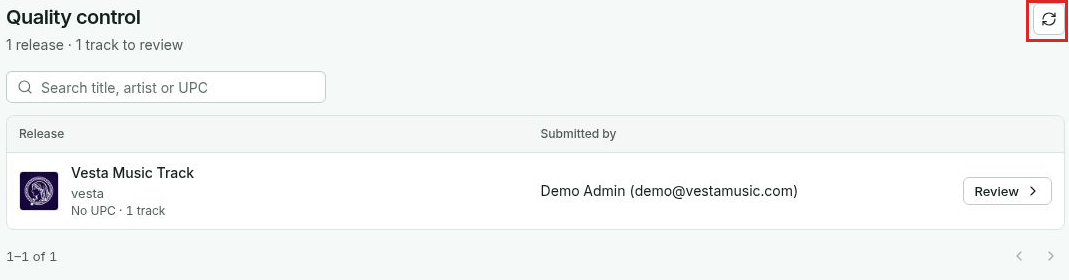
Refresh the queue to reload the current submission list.
You’re ready for the next step.
Need a hand with this guide? Talk to the Vesta team.